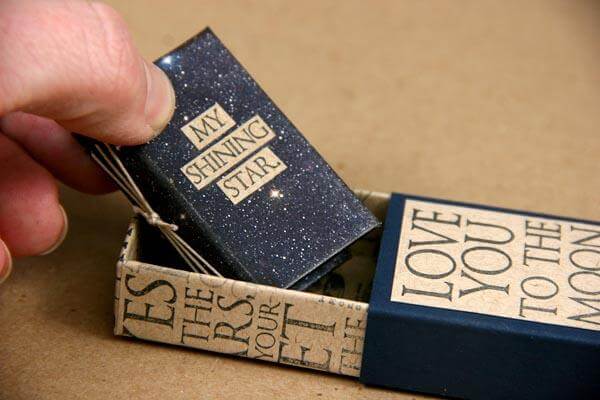
The Constellations Club Stamp kit is out the door, and soon you'll get your hands on the gorgeous text weight print inside the box. It's one of my favorite components from each collection! This month, I created a matchbox-sized album with one of the quadrants of artwork.

The 1-1/8 x 2" mini album fits perfectly into the 1-1/2 x 2-1/2" matchbox.

MINI ALBUM ASSEMBLY
1. Cut matte board or cereal box cardboard to (2) 1-1/8 x 2" covers and (1) 5/16 x 2" spine.

2. Trim the 8.5x11 Text Weight Print into four quadrants; trim the Navy quadrant to 3x3.75".

3. Glue the matte board pieces onto the Navy wrap, leaving a 1/8" gutter between the covers and spine. Mitre the corners and glue the flaps into place.


4. Cover the inside with 2-5/8 x 1-7/8".

5. Pierce three stitching holes through the spine, 1/4" from the top and bottom edges, and one at center. TIP: If paper tears on the visible outside cover to reveal the white core, use a dark marker to cover the white. That worked like a charm for me.

6. Cut (6) 2 x 1-7/8" inside pages. Fold in half. Pierce holes into the center fold of each inside page to correspond with the cover.

7. Thread waxed linen onto a needle and pamphlet stitch the three signatures consisting of two nested pages each to the cover.


8. Use waxed linen thread to tie the outside long stitches together in a square knot.


It's a sweet little mini album! I've already got the inside filled with special memories.


MATCHBOX ASSEMBLY
Since this mini album so cleverly fits into a matchbox that happened to be in my stash. I simply had to "Constellation-ize" it!

1. Trim a 5x6" outside box wrap and a 1.25x2.25" Inside Liner from kraft text weight paper
. 
2. Stamp the Kraft paper with images from the Constellations Collection UM sheet.

3. Glue the prepared paper to the matchbox.


4. Glue the liner to the inside base of the box.

Ta-Daaah!

Now that I wrapped the box, the sleeve no longer fits.
No worries. Use the following steps to create a new sleeve:
1. Trim a sheet of Constellations Navy Plain to 5-3/4 x 2-5/8". 2. Score horizontally at 5/8", 2-1/4", 2-7/8" and 4-1/2".

3. Wrap around the box to fit and glue sleeve together.

The quote from the Collection UM fits so nicely on the matchbox sleeve.


I have to admit, I had a "little" fun with this one.
Wishing you a creative day.
Kay