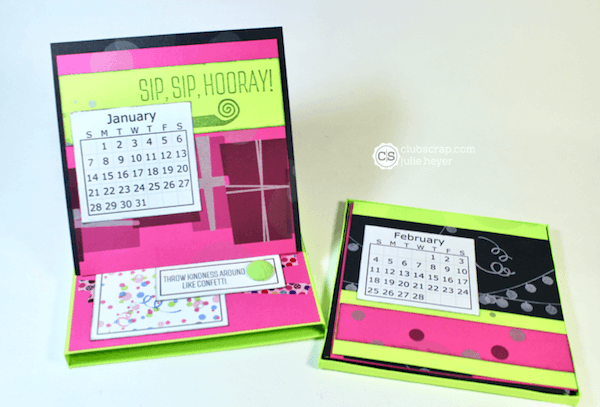

Create an Easel Card Box Calendar perfectly suited for any desktop.

Follow the step by step cutting instructions to make each calendar page and then learn how to make the easel card box, too!
Easel Card Box Calendar

Calendar Page Assembly
1. Download and print a 2018 calendar. I found this one on Pinterest.
2. Trim into 2-3/8" rows with a craft knife and 2x8 Acrylic Ruler on the Club Scrap Cutting Mat.
3. Trim each strip into 2-5/8" pieces.
4. Stack the months in order. 
5. Gather three 12x12" papers from the Surprise collection. I chose the Pink and Green Deluxe Prints and added a third hand stamped 12x12" Black Print. **Scroll to the bottom of this post to see how it was made.
- Trim each 12x12" at 9.5 and 4.75".
- Cut each 4.75x12 horizontally at 11, 9.5, and 4.75".
- Trim the 2.5x12 horizontally at 9.5 and 4.75".


6. Arrange the panels and calendars onto the twelve 4.75" square base pages created in the previous step.

Easel Card Box and Tray Assembly
Box Sleeve, Part One:
1. Gather the following:
- 5-1/8x10-5/8" Green Plain Box Sleeve
- 6x6" Green Plain Tray
- 5x10" Pink Plain Easel Card Base
- 5x5" Black Dlx Print Easel Card Panel
2. Score the 5-1/8x10-5/8" Green Plain horizontally at 1/4, 5-3/8, 5-3/4 and 10-7/8".
3. Rotate and score vertically at 3/8 and 5-1/2".
4. Fold on all score lines, and create tabs as shown.

Box Sleeve, Part 2:
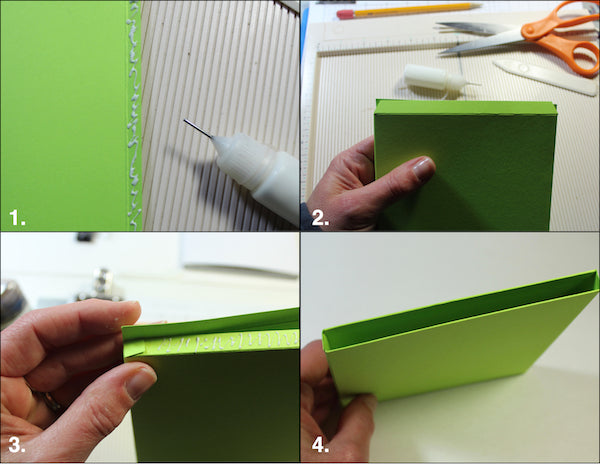
1. Apply Bookbinding Glue to the two short side flaps with a Needle-tipped Applicator and adhere to create a double thickness of paper.
2. Fold into a book shape with a 3/8" spine.
3. Apply glue to one long flap. Fold in the tab and adhere over the second long edge flap. Repeat for the remaining flaps.
4. The sleeve is complete.
Tray, Part 1:
1. Score the 6x6" Green Plain at 1/4, 1/2, 5-1/2, and 5-3/4". Rotate 90 degrees and repeat. Create tabs as shown.
2. Fold along all score lines.
3. Apply glue to the outside flaps next to the tabs.
4. Fold over and adhere.

Tray, Part 2:
1. Fold up the sides with the tabs. Apply glue to the first scored section of each side flap.
2. Fold in the tabs and capture between the flaps to complete the box.
3. The finished tray slides easily into the box.
4. The calendar pages fit perfectly inside the tray.

Easel Card Assembly
1. Score the 5x10" Pink Card base horizontally at 5 and 7-1/2".
2. Fold the card in half and then create a mountain fold with the second score line to create the easel mechanism.

3. Apply glue to the front of the mountain fold.

4. Lay the 5x5" Black print panel centered over the closed card and adhere to the easel mechanism.

5. Apply adhesive to the bottom of the Pink easel card.

6. Center and adhere to the top of the Green box.

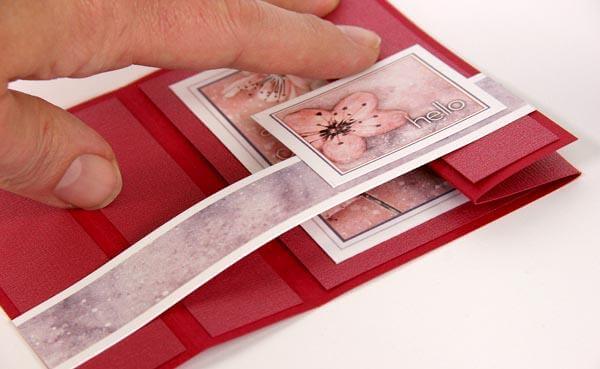
7. Slide the easel mechanism up to expose the Pink card base.

8. Adhere washi tape, cutaparts, and a Surprise Fabric Covered Button to the inside of the card.

These embellishments help to hold the easel open to hold the calendar page when in place.
Be sure to stop by my Cape Scrapper Blog during the Surprise Hop next week where I will share another clever calendar project. As always, Happy Crafting!
 Julie
Julie
** Bonus Black Print Tutorial
- Add a variety of Surprise stamped images to a 12x12" Black plain paper in White Pigment Ink.
- Dust the wet images in Silver Pan Pastels with a soft brush.
- An unused makeup brush worked perfectly to apply the Pan Pastels.
- Buff the images lightly with a soft cloth.
 Save
Save