Create a Dia de los Muertos stamped card with a vibrant embossed resist background sure to brighten anyone's day.
![Dia de los Muertos Stamped Card #clubscrap #dayofthedead #diadelosmuertos #stamping #colorbursts #cards](https://cdn.shopify.com/s/files/1/0440/9602/8828/files/Dia-de-los-Muertos-Card-15.jpeg)
Dia de los Muertos Stamped Card
![Dia de los Muertos Stamped Card #clubscrap #dayofthedead #diadelosmuertos #stamping #colorbursts #cards](https://cdn.shopify.com/s/files/1/0440/9602/8828/files/Dia-de-los-Muertos-Card-22.jpeg)
Embossed Resist Background
Stamp the sugar skull image onto a mixed media or water color paper panel with Watermark Ink. Sprinkle the image with white embossing powder and heat set to melt. Fussy cut a second skull stamped on sticky note paper to create a mask.
![](https://cdn.shopify.com/s/files/1/0440/9602/8828/files/Dia-de-los-Muertos-Card-1.jpeg)
Position the skull mask over the embossed image. Stamp additional images from the set over the mask with Watermark Ink.
![](https://cdn.shopify.com/s/files/1/0440/9602/8828/files/Dia-de-los-Muertos-Card-2.jpeg)
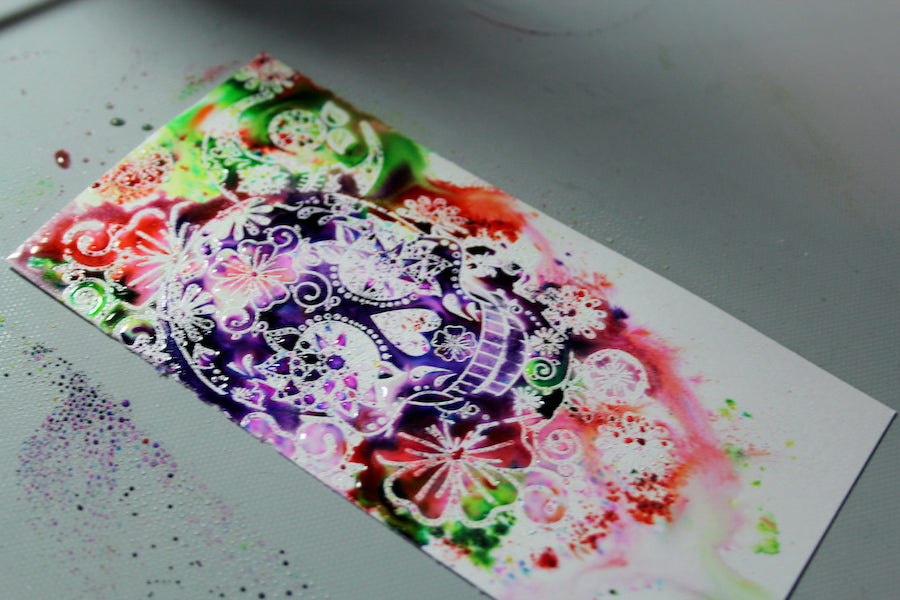
Remove the mask and cover the panel with white embossing powder.
![](https://cdn.shopify.com/s/files/1/0440/9602/8828/files/Dia-de-los-Muertos-Card-4.jpeg)
Tap the panel and remove excess powder with a small paint brush.
![](https://cdn.shopify.com/s/files/1/0440/9602/8828/files/Dia-de-los-Muertos-Card-5.jpeg)
Heat set the powder to melt.
![](https://cdn.shopify.com/s/files/1/0440/9602/8828/files/Dia-de-los-Muertos-Card-6.jpeg)
Lay the panel onto a nonstick craft sheet and spritz with water.
![](https://cdn.shopify.com/s/files/1/0440/9602/8828/files/Dia-de-los-Muertos-Card-8.jpeg)
Select four Color Burst pigment powders to work with along with Pewter Liquid Metals.
![](https://cdn.shopify.com/s/files/1/0440/9602/8828/files/Dia-de-los-Muertos-Card-7.jpeg)
Lightly tap the pigments onto the panels beginning with the lightest color. A little powder goes a long way!
![](https://cdn.shopify.com/s/files/1/0440/9602/8828/files/Dia-de-los-Muertos-Card-9.jpeg)
Continue adding colors to specific areas of the image. Note: Add Cadmium Scarlet to the flower images.
![](https://cdn.shopify.com/s/files/1/0440/9602/8828/files/Dia-de-los-Muertos-Card-10.jpeg)
Dust the skull with the Orchid and fill in any other remaining areas with Tangerine powder.
![](https://cdn.shopify.com/s/files/1/0440/9602/8828/files/Dia-de-los-Muertos-Card-11.jpeg)
Squeeze a small amount of Pewter Liquid Metals onto a nonstick craft sheet. Apply the color around the skull with a fine tipped paint brush.
![](https://cdn.shopify.com/s/files/1/0440/9602/8828/files/Dia-de-los-Muertos-Card-12.jpeg)
![](https://cdn.shopify.com/s/files/1/0440/9602/8828/files/Dia-de-los-Muertos-Card-13.jpeg)
Dry the panel with a heat gun held away from the piece to avoid re-melting the embossing powder.
![](https://cdn.shopify.com/s/files/1/0440/9602/8828/files/Dia-de-los-Muertos-Card-18.jpeg)
Remove any access puddles of color with a paper towel.
![](https://cdn.shopify.com/s/files/1/0440/9602/8828/files/Dia-de-los-Muertos-Card-16.jpeg)
The Pewter Liquid Metals add a beautiful sheen to the finished panel.
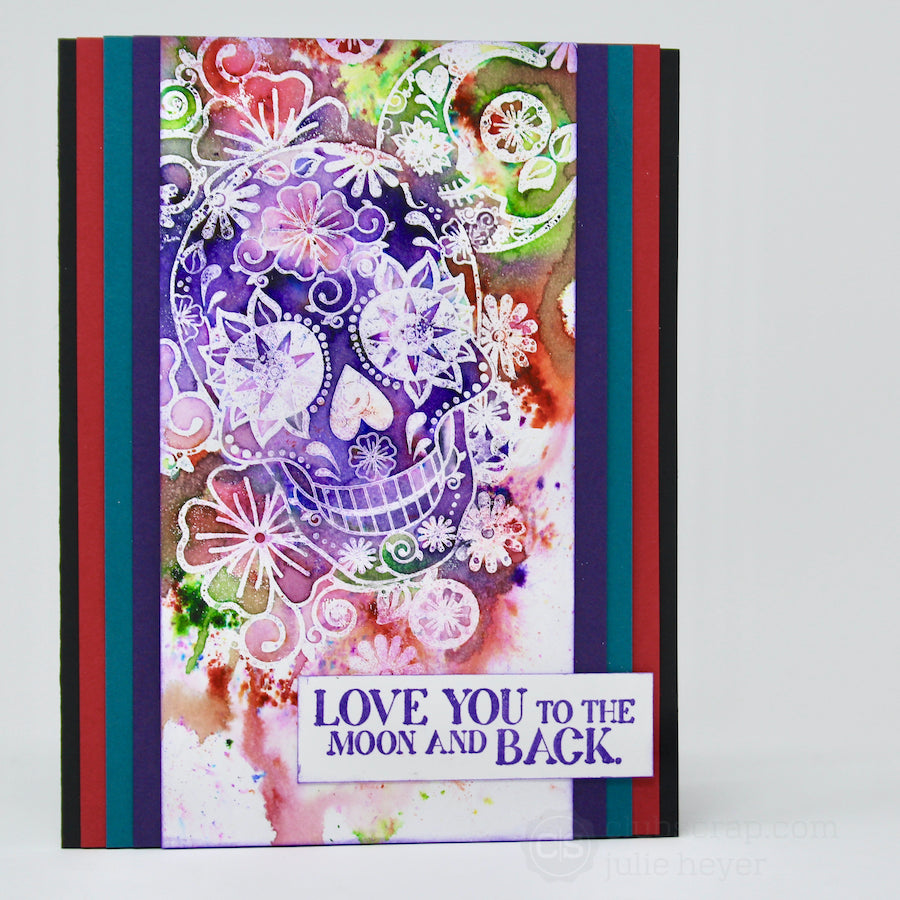
![](https://cdn.shopify.com/s/files/1/0440/9602/8828/files/Dia-de-los-Muertos-Card-17.jpeg)
Card Assembly
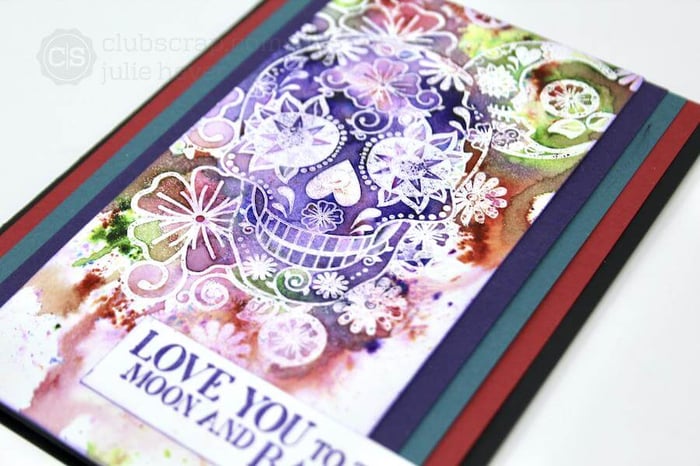
Trim the embossed panel to 2.75x5.5". Add the sentiment to a white strip with Amethyst ink using a stamping platform to ensure a crisp image. Distress the edges by adding Amethyst ink with an Ink Applicator Brush.
![](https://cdn.shopify.com/s/files/1/0440/9602/8828/files/Dia-de-los-Muertos-Card-20.jpeg)
Layer the embossed artwork onto a 3.25x5.5" Geodes Purple, 3-5/8x5.5" Turquoise Dk. Turquoise, and 4x5.5" Prism Red panel. Adhere all to a 4.25x5.5" black folded card base.
![Dia de los Muertos Stamped Card #clubscrap #dayofthedead #diadelosmuertos #stamping #colorbursts #cards](https://cdn.shopify.com/s/files/1/0440/9602/8828/files/Dia-de-los-Muertos-Card-25.jpeg)
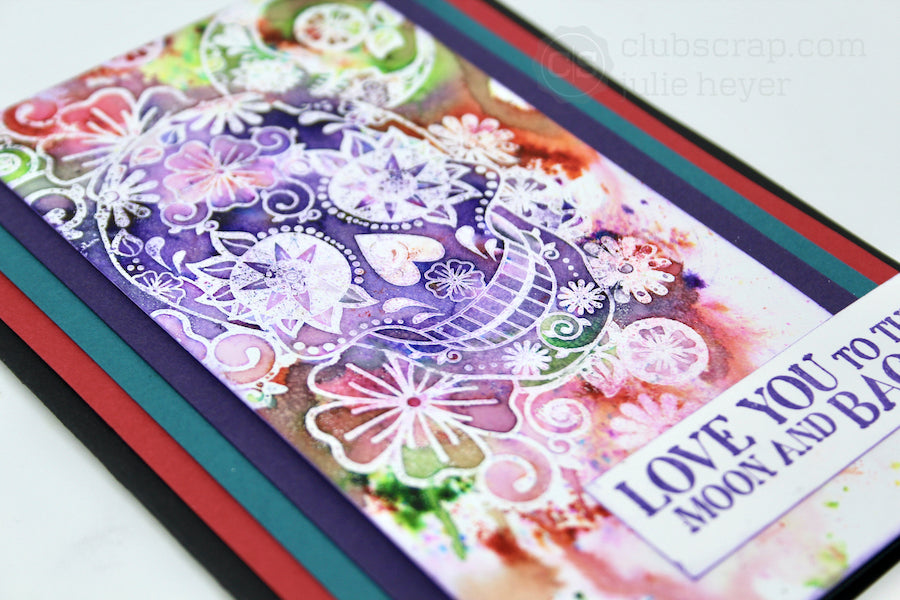
Let's take another look at the completed card.
![](https://cdn.shopify.com/s/files/1/0440/9602/8828/files/Dia-de-los-Muertos-Card-22.jpeg)
I hope you will give these techniques a try, and don't forget to pick up these stamps while supplies last!
Julie