
Create more layouts featuring gorgeous Coastal papers with the July 2023 Bonus Page Formula. The formulas are ideal for creating additional scrapbook pages that coordinate beautifully with your Coastal Page Kit layouts.

Members: Have you downloaded your July Bonus Formula yet? If you're not using this super-useful monthly membership benefit, I encourage you to start now!
Not sure where to find it? Check your inbox for your member-exclusive email with important links to the bonus formula, instructions, video tutorials and more. It is sent to active members* on their scheduled shipping day and looks like this:

*An active member is defined as one who paid for and received the current monthly kit.
July Bonus Page Formula

The July Bonus Formula creates a well-balanced two-page spread that holds fourteen or more photos. To make the layout, gather five 12x12 papers. Follow the trimming instructions on the printable document, then assemble the layout using the sketch as your guide.
Page Assembly Tips
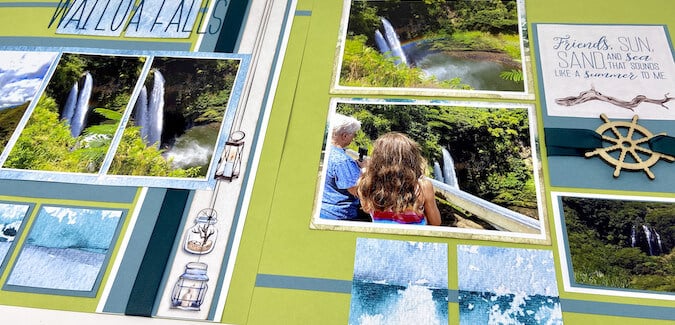
To recreate my layout, apply the following Coastal paper assignments: White (Paper A) Teal (Paper B), Shore Print (Paper C), and two Green (Paper D).

Customize the trimming instructions to the selected print. In this case, I wanted the smaller squares to highlight the waves and act as an embellishment instead of photo mats. Trim the paper at 5.75" then flip the print so the waves are trimmed in smaller squares instead of the sandy colored area of the print.

Assemble the layout according to the sketch. Use a grid ruler to ensure proper alignment of the 1/4" strips on the pages.

Run a bead of Bookbinding Glue next to the ruler with a Needle-tipped Applicator. Adhere the 1/4" strip permanently to the layout with the ruler as your guide.

Add a cutapart border strip and teal ribbon to the wide anchor strip.

Avoid covering artwork with a bit of craft knife magic.

Tuck the large photo mat under the lantern for added dimension.

Adhere a cutapart over the top portion of an unused photo mat. Thread equal lengths of teal ribbon through the Ship's Wheel Woodcut.

Wrap the ends around to the back of the photo mat and secure with tape.


Place your photos on the layout for a test run prior to cropping. Once satisfied with the design, trim the photos and make any final adjustments.

Die cut letters from Teal paper (Coastal Pack of Panels) to create a page title.

Adhere the letters across the squares with Bookbinding Glue dispensed from a Needle-tipped Applicator.

Let's take another look at the completed pages.

Happy scrapbooking!