Julie’s Light It Up Shadow Box project last week really inspired me. I was intrigued by that shadow box frame and had to make one for myself. Once I saw how easy it all came together, my brain started working overtime and I had a project idea!

Shadow Box Construction
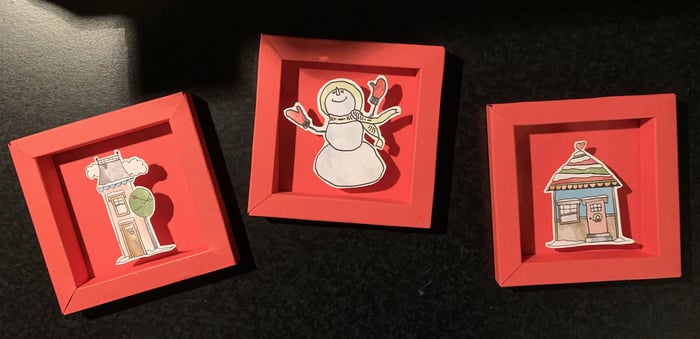
Trim three sheets of red plain and trim to 8x8” squares. Score each side at .5”, 1”, 1.5” and 2” and trim as shown below.

Once trimmed, construct the frame. Complete instructions for creating the frame can be found HERE. This will produce three 4" frames, each with a 3" opening.
Next, pick three images from the Christmas In The Neighborhood Hybrid Kit and print them on white card stock. Use Photoshop to resize the images so they are about 2.25” tall. If you don’t have a program that allows you to resize your images, try using your printer settings to reduce or enlarge the images. For example, reducing the image of the houses to 80% before printing worked for me. Test your printer using plain paper and black & white draft printing (to save ink) just to be sure.
Once printed, fussy-cut the images, leaving a small white border around each.

To make the images ‘pop’ in the frame, score a .5” wide scrap paper horizontally every 3/8” using a ScorPal. Once you’ve made 15 score lines, cut the strip into 5-segment lengths and glue them into little ‘pop’ squares as shown.

Glue one side to the back of each image and then glue them into the shadowbox frames.

Display the finished shadow boxes on a shelf. Or glue a length of coordinating ribbon and hang them on the wall. They’re so light, I stuck them to the wall with just a bit of masking tape looped on the back!

What else can you make with these shadow boxes? You’re only limited by your imagination!