Use a Club Scrap Sketch blast from the past (one of my favorites) from Aromatherapy 2003 when creating this layout with lots of layers. 
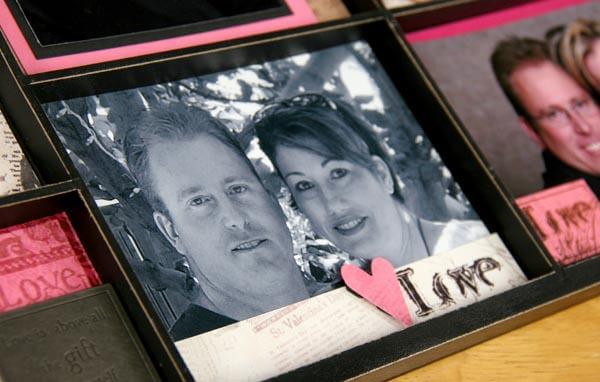
From this handy sketch I put together a layout featuring my close friend, Kerri, and her beautiful daughter. Bridget is such a special little girl and has been through an awful lot in her 6 years. I wanted to share Bridget's story with everyone in hopes of raising awareness for PACS1 Syndrome, a very rare genetic condition effecting only twenty (diagnosed) children in the world. By sharing Bridget's story publicly, Kerri hopes to bring answers to people who are struggling with being undiagnosed like Bridget was from the time she was born. Kerri is a successful blogger, and I hope you will take some time to read about her family's journey.

Here is how I created this layout.
1. Choose two 12x12 papers from the Love Ink kit. I used the dark pink plain and kraft print.
2. Choose the kraft print and flip it print side down, draw light pencil lines two inches from each of the four sides using a clear acrylic ruler.

3. Draw light diagonal lines from the inside corners created from step 2. They will intersect at the papers center point (see hand drawn sketch).
4. Make score lines following the diagram below. Dotted lines are scored and solid lines are cut. Use a score board to make the scored lines at 2 and 4" and then rotate the paper 90 degrees and repeat until all sides are scored.


5. Use a craft knife and cut the diagonal lines forming an X in the center of your print paper. *Tip- it is easier to score the paper before cutting the X.

6. Flip the print over and create a valley fold on the large score lines and mountain folds on the small score lines.


7. Use adhesive to secure the points down into place. Add Heart Dazzles, included in the kit, to each corner for embellishment. Color the inner paper edges with Earth ink for added dimension.

8. Attach the print paper to the plain dark pink base to complete the design.
9. Matte your photo, add a stamped quote or sentiment and embellish as desired.


I used a variety of flower punches from Fiskars, EK Success, Recollections, and Martha Stewart.
It is important to scrapbook life's challenges as well as the special occasions and every day moments. Thank you for letting me share Bridget's story.
 Julie
Julie