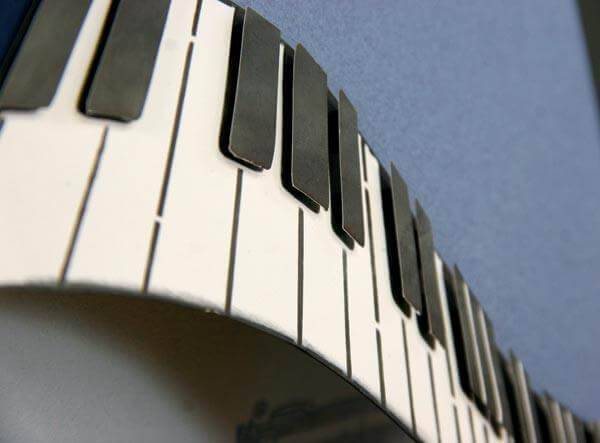

Sometimes I lie awake in bed and think about stuff. Like our new Keyboard Stencil, for example. I thought it would be fun to add a little dimension to the keys with foam adhesive. So I tried it. And it worked!


You'll probably want to try it, too, so here's how I made it:
1. Stencil the keyboard twice onto white paper with India Black ink and an Ink Applicator.

2. Trim one complete image from the paper with a detail scissors. Cut the "black keys" area from the second image.

3. Place black foam adhesive squares onto the black keys on the full image. As the keys get smaller, it will be necessary to cut the foam squares in half. Trim the individual black keys from the second image and layer on top of the corresponding key on the full image.

4. As the keys become smaller, leave the black key overlays together in groups of two or three. It may be helpful to work with a tweezers.

5. Admire the cool dimension! (At this point, the artwork can be applied to a project, tag, layout or card. )

6. Temporarily apply the keys to a folded 5x7" Navy card base. Trace the bottom edge of the keys with a pencil.

7. Remove the bottom edge of the card with a craft knife and cutting mat or detail scissors.

8. If desired, cover the upper right corner of the card with Denim paper.

9. Adhere the dimensional keys to the front card flap.

10. Stamp and embellish the card as you wish!


Lite, Greetings to Go and Club Stamp members, you still have time to add the Keyboard Stencil to your May shipment! Stay tuned throughout the month to see more great ideas for The Blues collection.