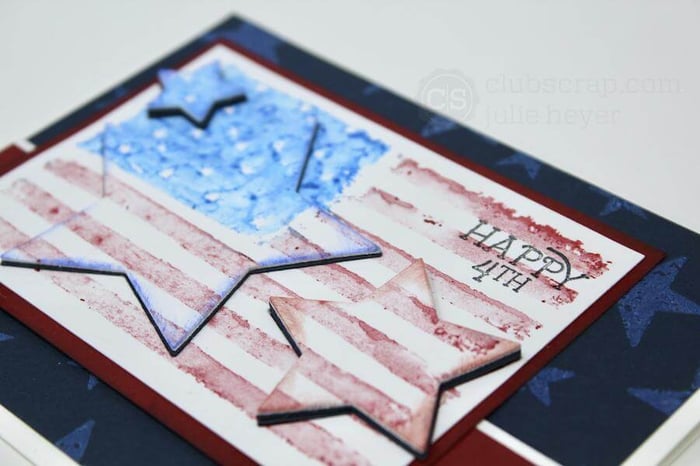
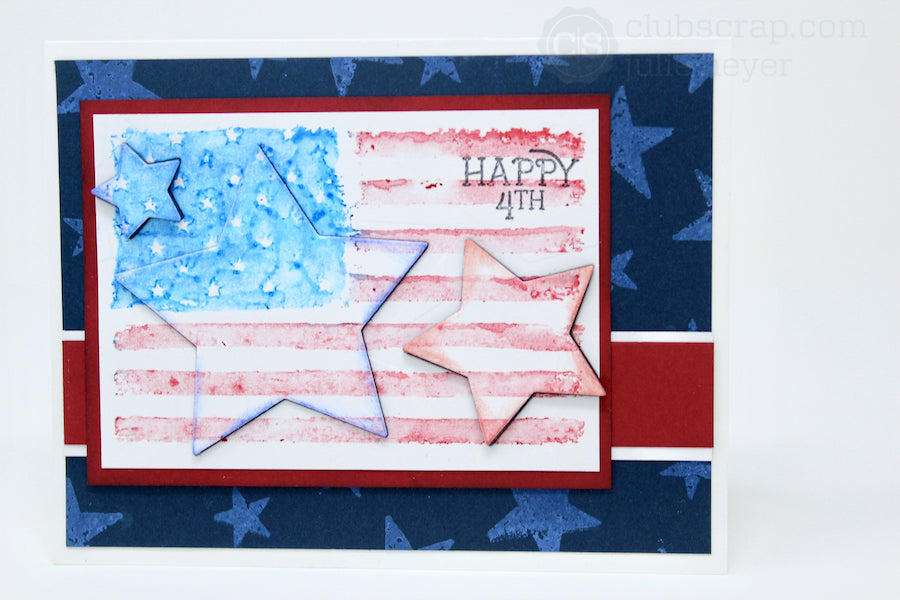
Create levels of dimension on the stamped American flag image with layers of die cut stars. The Needle-tipped Applicator filled with Bookbinding Glue made quick work of the assembly process.
![Die Cut Stars Vintage Americana Flag Card #sizzix #clubscrap #distressoxides #gelatos #card #flag #4thofJuly](https://cdn.shopify.com/s/files/1/0440/9602/8828/files/Die-Cut-Stars-Vintage-Americana-Flag-Card-large-2.jpeg)
Die Cut Stars Card
Add color to the flag stamp with Red and Blue Gelatos.
![](https://cdn.shopify.com/s/files/1/0440/9602/8828/files/Die-Cut-Stars-Vintage-Americana-Flag-Card-1.jpeg)
Spritz the stamp with water.
![](https://cdn.shopify.com/s/files/1/0440/9602/8828/files/Die-Cut-Stars-Vintage-Americana-Flag-Card-2.jpeg)
Stamp the image onto a piece of watercolor or mixed media paper. Allow the panel to dry completely before moving onto the next step.
![](https://cdn.shopify.com/s/files/1/0440/9602/8828/files/Die-Cut-Stars-Vintage-Americana-Flag-Card-stamped-flag-1.jpeg)
Lay three different sizes of star thinlit (Sizzix) dies onto the stamped image and run through a die cutting machine. Repeat this step with a white panel. Set the stamped flag panel aside to create the card.
![](https://cdn.shopify.com/s/files/1/0440/9602/8828/files/Die-Cut-Stars-Vintage-Americana-Flag-Card-3.jpeg)
Make multiple star die cuts (eight small, four medium, and three large) with Vintage Americana Blue panels.
![](https://cdn.shopify.com/s/files/1/0440/9602/8828/files/Die-Cut-Stars-Vintage-Americana-Flag-Card-4.jpeg)
![](https://cdn.shopify.com/s/files/1/0440/9602/8828/files/Die-Cut-Stars-Vintage-Americana-Flag-Card-5.jpeg)
Laminate several layers of stars together with Bookbinding Glue dispensed from a Needle-tipped Applicator.
![](https://cdn.shopify.com/s/files/1/0440/9602/8828/files/Die-Cut-Stars-Vintage-Americana-Flag-Card-6.jpeg)
Repeat this step with all of the star shapes.
![](https://cdn.shopify.com/s/files/1/0440/9602/8828/files/Die-Cut-Stars-Vintage-Americana-Flag-Card-7.jpeg)
Add three star image stamps to an acrylic block, add Distress Oxide Blueprint Sketch ink, and stamp onto a 4x5.25" Blue panel in a repeated pattern. Lightly mist the stamped images with water to activate the Oxide ink.
![](https://cdn.shopify.com/s/files/1/0440/9602/8828/files/Die-Cut-Stars-Vintage-Americana-Flag-Card-10.jpeg)
Adhere a layered Red and white anchor strip to the stamped panel and add to the front of a 4.25x5.5" white folded card base.
![](https://cdn.shopify.com/s/files/1/0440/9602/8828/files/Die-Cut-Stars-Vintage-Americana-Flag-Card-11.jpeg)
Trim the die cut flag panel and layer onto a Red mat. Glue each of the star shapes into the openings on the flag panel.
![Die Cut Stars Vintage Americana Flag Card #sizzix #clubscrap #distressoxides #gelatos #card #flag #4thofJuly](https://cdn.shopify.com/s/files/1/0440/9602/8828/files/Die-Cut-Stars-Vintage-Americana-Flag-Card-9.jpeg)
Add the Happy 4th sentiment to the flag and adhere the panel to the card.
![](https://cdn.shopify.com/s/files/1/0440/9602/8828/files/Die-Cut-Stars-Vintage-Americana-Flag-Card-13.jpeg)
Let's take another look at the finished card.
![Die Cut Stars Vintage Americana Flag Card #sizzix #clubscrap #distressoxides #gelatos #card #flag #4thofJuly](https://cdn.shopify.com/s/files/1/0440/9602/8828/files/Die-Cut-Stars-Vintage-Americana-Flag-Card-angled-right-3.jpeg)
For more die cutting inspiration, visit the following blog posts:
Happy crafting!
Julie